
Changing your website’s identity details — like the title, logo, and favicon — is one of the first steps in customizing your WordPress site. If you’re wondering how to change site title in WordPress, you’re in the right place.
This guide will show you step-by-step how to change your site title in WordPress, and also how to update your logo and favicon so your website looks clean and professional.
📍 Why Your Site Title, Logo, and Favicon Matter
If you’re serious about branding, you need to update all three. When you change site title in WordPress, you’re helping users and search engines understand what your site is about. A proper logo improves recognition, and a favicon helps users keep track of your site when multiple tabs are open.
Together, these changes create a consistent and trustworthy identity across all devices.
What You’ll Learn
- How to change your WordPress site title
- How to update your WordPress logo
- How to set or replace your WordPress favicon (also called a site icon)
How to Change Your Site Title in WordPress
- Log in to your WordPress Admin Dashboard.
- Go to Appearance > Customize from the left menu.
- Click on Site Identity.
- Under Site Title, type the new name you want for your website.
- Click Publish to save changes.
💡 Your site title appears in the browser tab and sometimes in your site’s header depending on your theme.
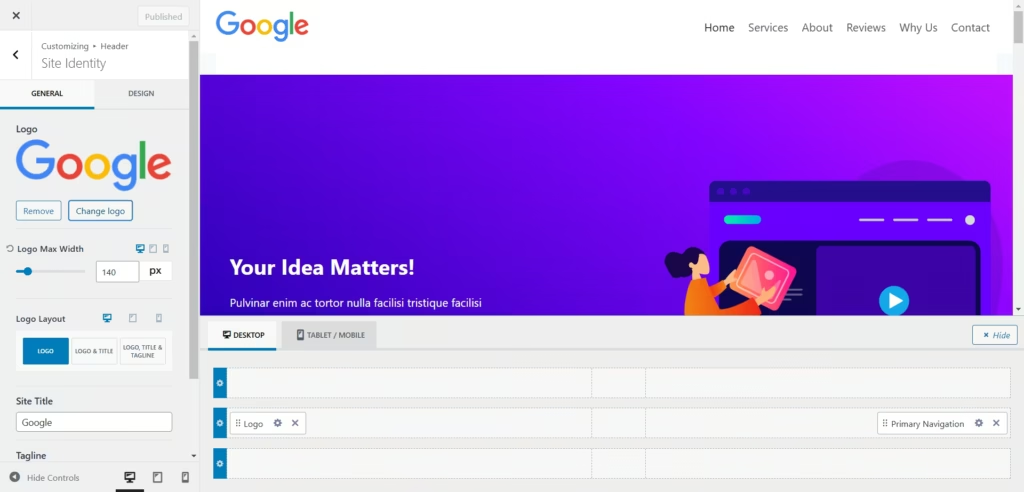
How to Change Your Logo in WordPress
Your logo represents your brand visually. To update it:
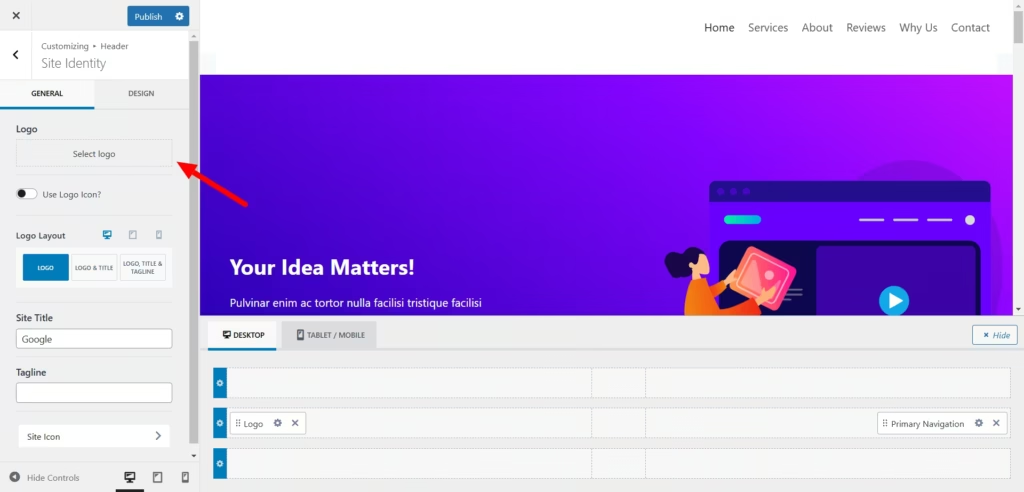
- From the same Appearance > Customize > Site Identity section,
- Click Select Logo.
- Upload a new image or choose one from your media library.
- Crop or adjust if needed.
- Click Publish.
Your logo will now appear in the header of your site, depending on the theme you’re using.
Note: The recommended logo size varies depending on your theme. A common size is 250×100 pixels.
How to Change the Favicon (Site Icon) in WordPress
A favicon, also known as a site icon, is the small image that appears next to your site’s name in browser tabs.
Here’s how to change it:
- Go to Appearance > Customize > Site Identity.
- Scroll down to the Site Icon section.
- Click Select Site Icon.
- Upload an image that is at least 512 x 512 pixels.
- Click Publish.
💡 Tip: Use a clear, square image — like your logo mark — that represents your site even at small sizes.

Where These Changes Appear
- The site title appears in browser tabs and search engines.
- The logo appears on your site header, depending on your theme.
- The favicon shows in browser tabs, bookmarks, and mobile devices.
Additional Tip: Make Your Site Title SEO-Friendly
When you change site title in WordPress, you’re also helping search engines understand what your site is about. A clear and keyword-friendly title tells Google — and your visitors — exactly what to expect.
Instead of something generic like “Home,” try using a title like “Fresh Bakes – Local Bakery in San Diego.” It’s simple, descriptive, and easier to find in search results. Keeping it short and relevant can improve both your SEO and your site’s first impression.
Final Thoughts
Now you know how to change your site title, logo, and favicon in WordPress — three quick changes that help build trust and brand recognition for your website.
They only take a few minutes but can make your site feel more professional and personal.
Don’t forget to click Publish after each change so your updates go live!
🔗 Related Internal Links
How to Log In to Your WordPress Website Admin Panel
Top 5 Critical Mistakes When Creating WordPress Passwords
🔗 Helpful External References
WordPress.org – Site Identity Overview
Google’s Favicon Guidelines